
Project: Photo-Video Hide with Bird pound 4x2 m in our Garden

I have now put together an article with documents for interested replica builders about the construction and implementation of the entire project. There is also a small photo gallery.
I planned the pond and the hide from the point of view of photography in an east-west direction. The birds are most active in the morning and mid-morning, so I need good and not too harsh light that illuminates the subjects from the front. But there would also be the opportunity to take photos from a Western hide point in the afternoon, that was the plan.
For the pond I had to level an area of 4x2m with a height difference of approx. 30 cm. Since I dug everything up by hand and our garden is very rocky with slabs of rock, it wasn't easy to work with. I finely sieved the excavated soil so that I could later use the fine material as a substructure for the pond liner.
The pond liner with the dimensions 4x3 m is 1mm thick and came pre-cut from Germany. The pond liner has an overhang on the left and right sides that covers the side edges. I built the side edges using soil to compensate for the slope, then additionally with 4 m long plastic pipes DN125 mm. The conclusion then form 4 m long wood 30 x 60 mm. The free ends were modeled with stones and soil, which are later to form the planned resting areas for the birds. After spreading the fine soil, a foil is laid out against growth from below in the next step, then the pond foil, as you can see in the photos. Then you can fill it with water and see that the foil lies neatly in the rounded corners.
I then got large, rounded stones at the sea and thus formed the first steps in the water space at the ends for the further design of the approach zones. The pit for recording the hide hut is created at a distance of 1.5m from the pond, so the entire photo area remains behind the pond with 1.5m to 5.8m in the usable focal length range of a 100-400mm and 150-600mm lens.
My Floating Hide Project
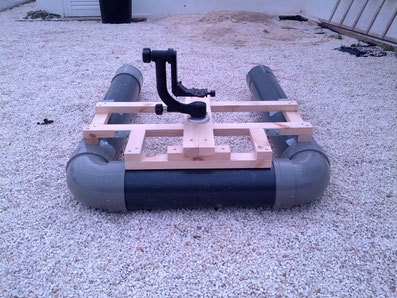
It was a challenge and a big wish of mine to make Photos and Video recordings of waterfowl in the eye to eye level.
Today, after 3 Years I have spend many hours in the Pools and watch the waterflow and other interessting activities in my Hide.
Sometimes , when a Kingfisher sitting on Top, this are just great Moments for me.
My floating cover Hide place to build a secure basis for the expensive equipment is with a load of 25 kg.
See in my report on this as I have implemented it.
I've attached below file the drawing for the construction of the floating tarnzeltes with the material list as a PDF download. Those who are interested can make like this, I must point out however that anyone who builds up the raft, makes this at your own risk.
In the photo gallery I included images of individual components and stages of construction. And now have fun with tinkering and more shooting.